 |
| Nurgle, please... |
Flying Daemon Prince type guy:
Flying Daemon Prince type guy:
Flying Daemon Prince type guy:
9x Nurglings w/ Herald
9x Nurglings w/ Kumar
10x Plaguebearers
10x Plaguebearers
10x Plaguebearers
 |
| Plaguebearers |
I need to get some pics of his HQ and Daemon Prince guys. His army was painted up awesome-ly. I really liked all his little conversions and I want to get a pic of the flying prince that has the rotor things from the Plague Drone instead of wings. My list was the same as usual. I'm keeping with it until I figure out what needs to change. I can tell already, I'm gonna need something to help with those single- and dual-Helldrake lists.
HQ:
Sammael: Corvex (jetbike)
Librarian: SM Bike, Level 2 Psycher, Power Field Generator
RW Command Squad: Apothecary, Champion, Standard of Devastation,
Troops: RWAS=Ravenwing Attack Squadron x6
RWAS: Melta Gun x2, Attack Bike w/ MM
RWAS: Melta Gun x2, Attack Bike w/ MM
RWAS: Plasma Gun x2, Landspeeder Typhoon w/ HB
RWAS: Plasma Gun x2, Landspeeder Typhoon w/ HB
RWAS: Combi-Plasma, Plasma Gun x2, Attack Bike w/ MM
Fast:
Black Knights: Power Weapon
 |
| "WHITE Knights" |
Top of 1:
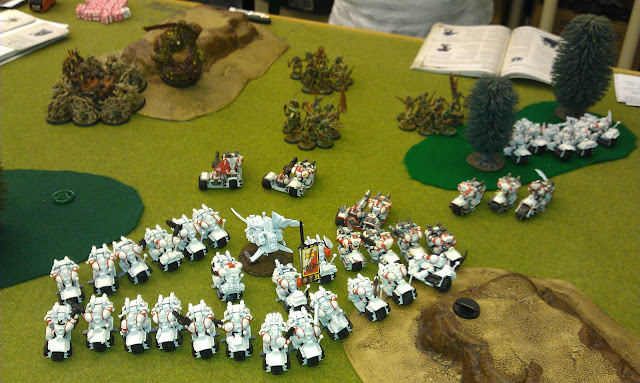
The game started off bad for him, and just got worse from there. I seized the initiative, which is just too good. I rolled Invisibility for a psychic power and cast it on my command squad. GO 2+ COVER SAVE!!!! My first goal was to get his nearest prince to take a grounded test. The first squad managed to score 3 snap shots, but he passed the grounding. The next squad managed 7 snap shots; grounding him and doing a couple of wounds. Then the White Knights plasma'd him up for a couple more wounds. Another squad took him out with bolter fire. So I tried the same thing on the other prince on the right. Esentially got the same thing to happen and had him missing 2 big guys at the end of the turn. I tried to do the same to the last prince, but I had run out of guns. I have no assault moves.
 |
| Middle of turn 1. |
 |
| End of Turn 1: |
Top of 2:
I use my moves to get everone within 24" of both the Plaguebearers and the Prince. Shooting makes short work of the Prince who made enough saves to require more of my attention than I wanted to give him. My old Librarian, now in Nurgle form, didn't last long. The Plaguebearers took some plasma and bolt shells to the face, and then got assaulted by the guys who know how, finishing them off. I tried to finish off the HQ and end the game, but all of my Multi-meltas rolled 1's to-hit and the T7 was too much for the few remaining bolter shots. I think I only managed one wound.
 |
| Middle of turn 2. |
He got all of his reserves except for the one unit of Nurglings he wanted. See below for how he chose to have them deepstrike. The HQ casted Enfeeble on one of my attack bikes and failed his psychic test for another power. There was very little he could do. No units had shooting attacks and Nurgle daemons are slow and purposeful so they can't run. His turn was done.
 |
| End of turn 2. |
Top of 3:
My turn consisted of moving the command squad up into the woods near the Nurglings. They got within 12" to make use of the Ravenwing Grenade Launcher. Again, the rest of the full bike squads got within 6" of the Standard. The White Knights backed up to be 9" from the nearest Plaguebearers for the double tap. The small squad moved in front of them for a screen. I used the Rad Grenade coming from the command squad and got a hit, reducing the Nurglings to T2. Sammael hit dead on with his plasma cannon, too. With the Nurglings at T2, they were being insta-killed by bolter fire. Notice the complete lack of Nurglings at the end of the turn.... I also took down the HQ and did some damage to two of the plaguebearers squads. I managed to get one attack bike into range to charge some Nurglings, trying to tie up the unit. I killed off one, but they have those poisoned attacks, so the attack bike was killed and the Plaguebearers consolidated closer to me instead.
 |
| Middle of turn 3. |
His last unit came in from reserve. He rolled a 9 on the Warpstorm table which causes a S8 blast hit on an enemy unit on the roll of a 6. He got four 6's out of 12 units, NICE! The first shot scattered into his Plaguebearers, killing one. I lost 2 or 3 bikes from it all. Thank god for my 5+ Jink save. His small unit of Plaguebearers charged my screening unit, but got wiped out by the bikers. Another unit charged the Bikes in front of my command squad. I think we actually tied that combat, and my guys failed their Hit & Run roll.
 |
| Bottom of turn 3. |
I moved everyone toward his remaining units. The Nurglings got hit with the Rad Grenade again and they were shot to death by the White Knights. The full squad of Plaguebearers was shot up and charged, getting wiped out. We finished off the combat from the previous turn, and he was left with one Plaguebearer. He conceded to me at this point.
 |
| Middle of turn 4 and End of the game. |
No comments:
Post a Comment