Sunday, December 8, 2013

White Scars Apothecary Finished

White Scars Apothecary

     So after months of not painting, I finally got back into it.  Here is my completed Apothecary.  It will be fielded using the Dark Angels rules, hence the Plasma Talons mounted to the bike.  I had a blast painting this guy.  Being a veteran, he had way more red on him than the average biker.  This let me get some practice in with shading using the crimson wash.  It is actually pretty easy to get to the level I did, since I didn't bother with any oranges for hi-lights.  The red sawtooth pattern on the fairing and his left greave was something I'd been wanting to do for a while, but I wanted to save it for the Veteran and Command models.  


     I was finally able to make use of a bunch of bike bits I had from the old scout bikers.  There is the bolter mounted to the side of the front wheel, complete with a shovel and some shotgun shell looking things.  On the back is a piece from a random set of ATVs that I picked up forever ago.  (I made one of them into a scout biker sergeant, but I didn't like the overall look.)  The piece looks like a teleport homer and has that cool camo netting rolled up.  One day, I will own the proper colors needed to paint everything, but that will do for now.  I'm currently also working on converting a Librarian and a Techmarine for my White Scars, and both are nearly ready for the painting table.  They, however, will have to wait in line behind the rest of Sammael's command Squad.  I'm looking into having one or both painted by either of my gamer friends who are far more talented than I am.  I'll be sure to get some pics up ASAP.  Let me know what you think!

Sunday, August 18, 2013

PLAY DROPZONE COMMANDER!!!

     I have recently become addicted to Dropzone Commander. If you haven't heard about it, check it out on their website at www.HawkWargames.com

     They have just announced a new product. There is a two player starter set coming out at the end of September. The set includes two full armies, the full size rule book, and some cool 3D buildings with a map to put them on. All this is cheaper than I paid for my original one army. Check out this product at http://www.hawkwargames.com/collections/misc-rules


     Speaking of my army,  I have it assembled and finally got in a game.  Here are some pics. 

     This is the Post Human Republic. They are essentially part androids who have superior technology over the standard humans, but much smaller numbers. 

     Here are my Phobos anti-air walkers with their dropship. They are needed to shoot down enemy flyers and dropships. 

     These are the Ares anti-tank walkers. They have a high strength railgun to take out armor.

     Next is two squads of Immortals with their Juno APCs. Theses guys are necessary for going into buildings and searching for objectives. The soldiers embark in the Juno, which is then carried by the Neptune dropship. 

     Last is a squad of Sirens. These all female infantry are truly badass in close quarters battles inside buildings. They have a A2 type Juno with anti-infantry guns. 

     I'm excited about the new starter set, as I will buy it so I can get more people a chance to try out the game. I know it won't be long before everybody is as hooked as I am!

Friday, July 26, 2013

I'm Back

     After a long vacation from this blog, I'm finally back into putting up posts.  Kind of a crappy excuse for why, but our house got robbed.  They took my laptop, among other items, and I haven't been motivated to write since.  But since I just got an offer for a new job, I'm feeling more like myself again.  SO, WHAT TO POST??????

     I know, I finished my main HQ.  Sammael of the Ravenwing, or as he's know in my White Scars army, Samm'E Khan!!!!  aka Sammy Hagar, aka Sammy Davis Jr., aka your worst nightmare......

Samm'E Khan

     So to build the conversion, I started with the Sammael model in Finecast.  And yes, it sucked.  None of the parts fit together and they all had to be run under hot water and then held together as they cooled.  I am glad, however, that the thing weighs less than 15 pound like the metal model.  That thing could break a flight stand just by breathing on it.

     The next step was the conversion work.  First, I removed the head, which felt kind of heretical.....  Then, I had to cut out the left shoulder pad to make way for the White Scars one.  This was somewhat difficult due to half of it being "underneath" the cape.  I didn't want to have to completely hack off the arm to do it, so there was some skill (read: blood) involved.  Then, I did a simple removal of the eagle head on the front of the bike to make room for the lightning bolt, which was cut from a piece of plastic stock.  The bolt mounted nearly flush with the front of the bike with a little trimming, and I put the head back on to resemble, somewhat, that the eagle was coming thru the bolt.  It ended up cheesier than I had hoped, but it is the good kind of cheese.  Like how everything in 40k is exaggerated.  I then had to remove a few small Dark Angels symbols from the model, but that was easy due to their small size and being raised instead of recessed.

     To add to the White Scars/Mongolian feel, I obtained some bits from the Fantasy Chaos Marauder Horsemen box set.  The heads on about 4 or 5 of these guys scream Mongolian.  From the Fu mustache to the single braid coming from a shaved head.  I got my buddy Brandon to paint the face, as that is clearly a weakness in my painting and I wanted my centerpiece to stand out.  There was some green stuff required to prop his head high enough for the mustache and braid to clear the armor.  I also inserted on of the metal White Scars shoulder pads on the left arm and two round shields that come with the White Scars Bikers on either side of the bike.  I didn't like the feel of the giant book on the top in front of the handle bars, so I scrapped it for use on my Librarian Bike (soon to come) and replaced it with a standard stowage that comes with the DA attack bike.  Finally, I hacked the sword off just above the pommel and added one of the White Scars blades to complete the feel.


     Painting was not too hard, and I didn't try anything fancy.  I spent the most time on the cape, as I can do the look I want, but it takes forever.  I was sketchy on doing the gold thing, but now that it's finished I feel that it is the appropriate level of gaudiness that a Captain should have.  I am not at all happy with the way the sword turned out, so I'll be redoing it when I get a chance.  It's possible it just needs white in it to separate the green from the black, but I don't know.

     So I finally have ONE MODEL in my bike army painted to the standard I'm looking for.  I have been working on my command squad 10-15 minutes here and there in between job searching, apartment searching, and going crazy from living with my in-laws.  Now that we found a place I should have plenty of time and far fewer excuses.  I hope to be able to show off the command squad with thier fancy Plasma Talons and Corvus Hammers soon.  Tell me what you think, why don't ya.....
   

Tuesday, April 23, 2013

New Larger Ravenwing Command Squad? Why, Yes I Will!!!

     I was reading through the new FAQs that were recently posted on GW's website.  In the Dark Angels one, they have added the option for adding up to 2 more bikers to the Ravenwing Command Squad.  This is a very good bit of news.  First, I had been taking a Librarian just to increase the number of wounds that my command squad could lose before getting rid of the Standard of Devastation.  Second, with a 5-man unit of Knights escorting my Eternal Warrior, AP2 wielding HQ, I do believe that I will finally have another close combat unit. 

     Now, for 40 points each, they are a bit expensive to be using simply as extra wounds.  But, these guys come with twin-linked plasma guns and +1S, Rending close-combat weapons to go with their 2 attacks.  This unit can charge and has 6 Hammer of Wrath auto-hits at I10, then Sammy's 5 AP2 attacks at I5, followed with 19 S5 Rending attacks.  I think I like it...

     Now the question is, do I still use a Librarian?  He is incredible when I roll Invisibility for his Psychic Power.  I love Bikes with a 2+ cover save.  I don't know if I have the points to spare, unless I want to shrink my model count by even more.  I guess I need to start on a new list!  CAN'T WAIT!!!

Monday, April 22, 2013

Standard of Devastation becoming standard equipment.

A couple weeks ago, I played SeeJay87 up at the ol' game shop.  I ran my standard list from before, except I got rid of all the Librarian upgrades for an additional Speeder.  He was playing his fairly new-ish Space Wolves.  This is approximately his list, based on my memory and an older list I found on his blog:

HQ:
Logan Grimnar

Troop:
10 Gray Hunters, 1 plasma gun
-Rhino
10 Gray Hunters, 1 plasma gun
-Drop Pod

10 Wolf Guard, 10 combi-meltagun, 1 power fist
-Drop Pod

6 Wolf Guard in terminator armor: power axe and storm shield, thunder hammer and storm bolter, power sword and storm shield, thunder hammer and storm bolter, power sword and assault cannon, power axe storm shield
-Land Raider Crusader

Heavy:
6 Long Fangs, 5 missile launchers
-Razorback with TL lascannon

6 Long Fangs, 5 missile launchers
-Razorback with TL lascannon

100 pts Aegis Defence Line with quad gun


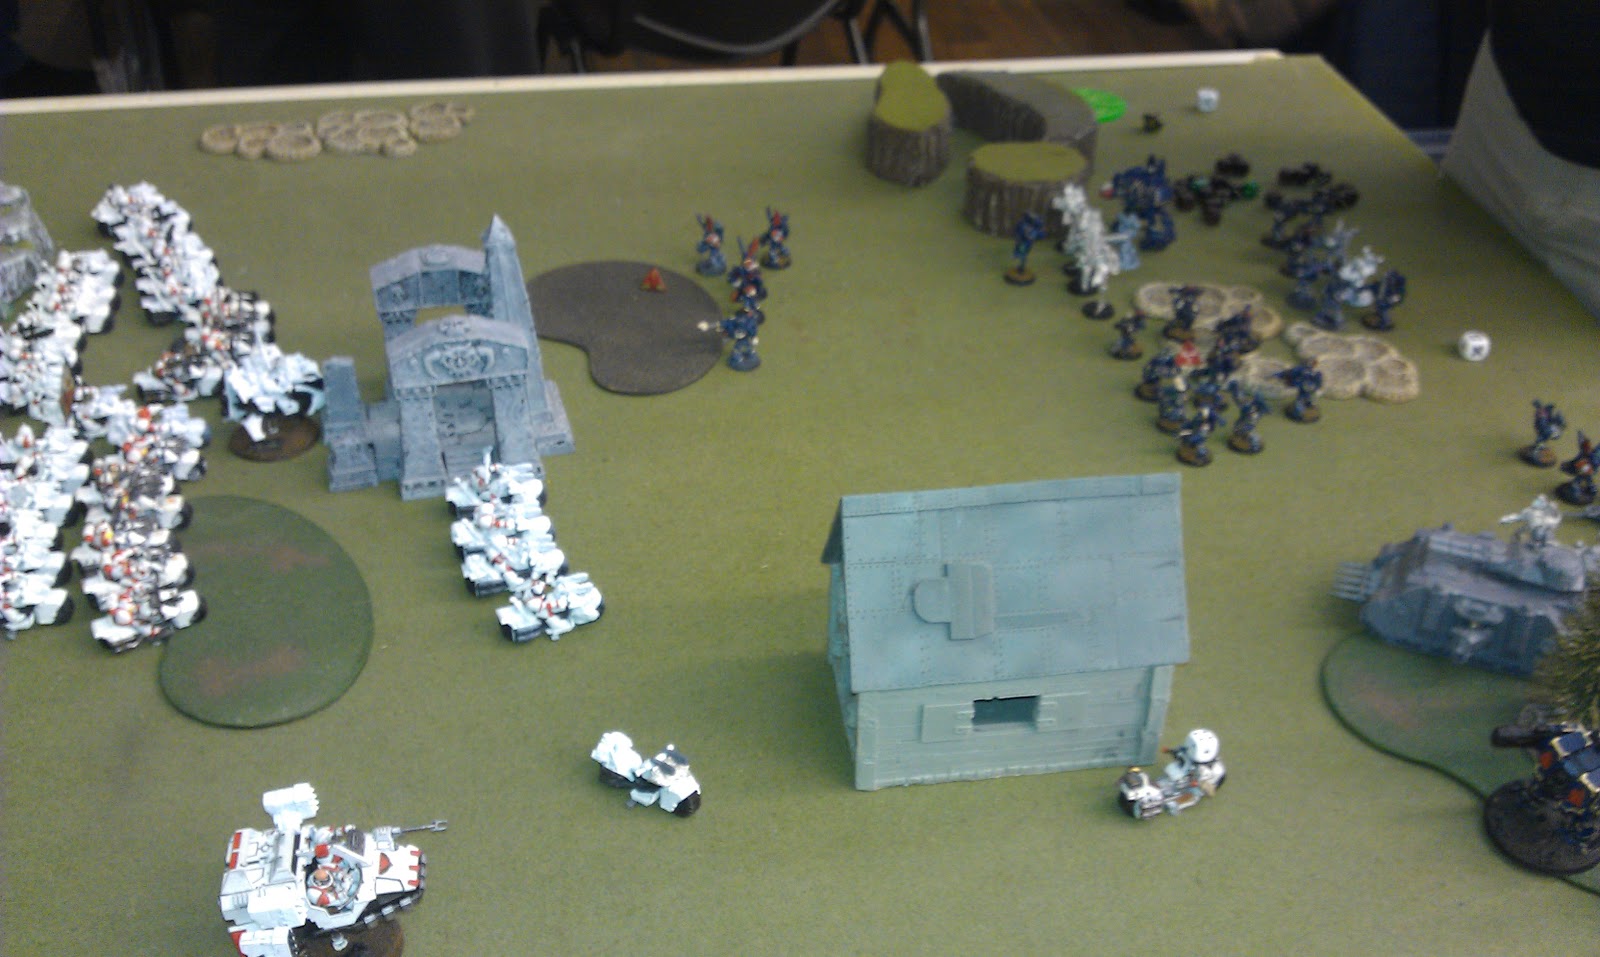
     The mission was The Relic with Dawn of War deployment.  He won the roll-off and chose to set up first.  He deployed one unit of 5 Missle Launchers on the second level of the ruins in the top right of the board and the other 5 Missle Launcher behind the defense line next to it.  Their transports were deployed nearby.  In the center of his deployment zone, he put his Landraider with Logan and the Terminators.  The Rhino with Hunters was on the left. 

     I deployed Sammy, the Librarian, the Command Squad and all 3 Plasma squads on the right flank.  I had a nice line-of-sight blocking building that I could hide behind by using my scout move.  This would keep me clear of the Long Fangs behind the defense line. 

     My two Melta squads and Attack Bikes deployed near the line-of-sight blocking building in the center, intent on scouting up behind it to get out of sight of both of the Long Fang squads.  All 3 of my Landspeeders were deployed as far back and to the left as they could go.  This kept them out of range of the long fangs.  Finally, the White Knights deployed in the ruins in the left side of my deployment zone.  My scout moves consisted of everyone moving closer to the enemy, but focusing on gaining cover. 

     My lucky butt rolled a 6, and I siezed the initiative!!!!  Sorry SeeJay......

Top of 1:  I moved up the command squad to keep the banner hidden behind the building, but then realized that I could get within 12" of the Long fangs in the ruins to hit them with a Rad Grenade.  The 3 Plasma Squads moved up into range of them as well.  The white knights moved up in front of the center building, looking to shoot up the (not-so) juicy insides of the Landraider that I planned on blowing up.  To do this, I moved both attack bikes in front of the Knights and within 12" of the Landraider.  One of the Combat Squaded Melta Guns moved up in range as well.  I used the other Combat Squad to provide a screen against the imminent counter-assault from the Termies that I would surely see.  The other Melta squad aimed themselves at the rhino to try to keep them at a distance.  The Speeders stayed in place, already in range of their targets.


Middle of turn 1.
     On the right side, my shooting saw the Long fangs hit by the Rad Grenade and going down to T3.  Two Plasma Talons and Sammy's Plasma Cannon cut them in half, and the first Salvo of bolter fire finished them off.  The second Salvo had tremendous luck against the second squad of Long Fangs, cutting them down to only the man on the Quad Gun.  The front squad, with no real shots remaining, simply turbo-boosted up behind the ruins, with the nearest Razorback in their sights. 


Middle of turn 1.
     On the left side, the shooting was not as effective, but not too bad.  My Multi-melta Attack Bikes either failed to hit, or failed to penetrate his Landraider.  Same with the Melta Guns, so my Knights had nothing to shoot at.  The first Speeder shot at the Rhino and took off a hull point and the second blew it up!  I managed to take out half of the squad with the two Combat Squads. 


Bottom of 1.
 Bottom of 1:  His movement phase started with the first Drop Pod full of Combi-meltas coming down right behind the Command Squad.  I knew to be looking for that, so I was glad I left my Librarian the furthest back to protect the Banner.  Next the Landraider moved up a bit and the contents emerged.  The remaining Gray Hunters moved toward the fight.  His shooting started with 10 Combi-meltas, hitting and wounding 8 times!  This was gonna hurt....   So I started rolling, and failed 3 of the first 4 Jink saves.  BUT THEN, I remembered that the squad has Feel No Pain, and I rolled their saves up.  Overall, I ended up only losing 1 wound on the Librarian and 1 on SammyDavisJr!!!  Sorry again...

Bottom of 1.
     In the center, his Landraider shot up the White Knights, along with the Quad Gun and one Razorback.  I ended up failing only one save.  I am loving their 4+ Jink from having Skilled Rider, but I did forget to turbo-boost since I had no target to shoot at.  The other Razorback penetrated the nearest Landspeeder and immobilized it.  Fortunately it was still pointed in a good direction.  The terminators shot up the  combat squad that I set up as a screen, but only killed one due to being mainly set up for hand-to-hand.  Then they charged in.  They went ahead and did a disordered charge against both combat squads.  They do lose their bonus attack for charging, but they have plenty of killing power to take them on.  I managed to take out one of the terminators, but lost the fight.  The terminators consolidated back towards the Landraiderto try to protect Logan. 

Top of 2:  I swung 2 of the Plasma Squads and the Command Squad around to get them all pointed at his Wolf Guard from the Drop Pod.  I focused on keeping the Plasma Gunners in front so he wouldn't get any cover saves.  They ended up taking them out with the help of another Rad Grenade.  The last Plasma Squad moved toward the Razorback, and managed not to even get a glancing hit against the rear armour.  My Librarian broke off and moved toward the Razorbacks.  I got his Puppet Master power to go off on one of them and shot at the Landraider, but failed to penetrate.  Looking back, I should've shot the other Razorback.

     In the middle, I swung the Attack Bikes around to get shots at Logan, while the Knights moved in to engage the rest of the Terminators.  The remaining bikes moved in, too, ignoring the Gray Hunters.  My shooting from the Knights, Attack Bikes and Melta Bikes saw the Terminator squad cut down to one man and Logan.  The charge did not have the the power I needed, due to his Counter-Attack and Logan's crazy attacks.  I don't remember the outcome, just that it was not good. 

Bottom of 2: His second squad of Gray Hunters came in on their Drop Pod right next to the relic.  Some more shooting slims down the remaining Combat Squads near the Terminators.  I lost an Attack Bike as well.  Assault saw Logan Killing another Bike or two.  I'm not too sure about the details, but it was feeling like a stalemate in the middle.  One of his Razorbacks took out my Librarian, who was now on his own.

Top of 3.
Top of 3:  I moved my Salvo blob into range of the Gray Hunters on the relic.  I took out all but 2 with my shooting.  The Plasma squad popped one of the Razorbacks.  Logan at some point finished off everything I threw at him.  I do believe that Logan was a pain in my side, but I feel like he could have been worse.  I think that CJ tried to use his S6 I5 attacks too much and if he had relied on the S8 I1, I would not have lasted so long against him. 

Bottom of 3, Rest of game:  I don't know the exact way the game went down, but I finally took out the Gray Hunters that started on my left, removing his last scoring unit.  At that point he conceded to me. 

Conclusion:  Overall, I got First Blood, Linebreaker, and the Relic to his Slay the Warlord.  Seizing the initiative was crucial to the level of success I had.  My shooting would have been reduced had he thinned them out first.  I also got pretty lucky with my saves in the first turn, losing only one White Knight and a wound on both the HQs.  I felt that I took advantage of the cover provided and of how much he spread out his army.  It allowed me to pick off a unit at a time on right side, but it did keep my Salvo blob away from his terminators.  I finally learned to keep the Speeders away from the action, and just sat back and shoot.  I would like to try to get 3 Multi-Melta Attack bikes into a list, because I have had horrible luck with their shooting.  I don't want to sacrifice the power of the speeders, so maybe I need to make the Bike Squads smaller.  I'm open to comments and criticism.  My biggest accomplisment for this game was to use half of the army without the aid of the Standard of Devastation.  I don't want it to be a gimmick army list, and I proved that I can still play it like I used to play my White Scars.  Granted, I lost every bike that I threw at the center of the table, but I did take out 6 Terminators (3 with Storm Shields) and all but 1 wound from Logan.  On top of that, I had a Rhino full of Gray Hunters to deal with.  I did realize that I should have mixed the Plasma and Melta squads between the sides.  I suppose I was thinking about trying to pop the Landraider, but I would have LOVED to have some more Plasma love in the middle in addition to the White Knights.  I almost never use the special weapons in the blob I keep near the Standard of Devastation.  I might drop one unit's Meltas and one unit's Plasmas.  I suppose I will see.  What do you think? 


Almost the end, just before the Gray Hunters fall to shooting.


Friday, March 22, 2013

Tau'ch! (ouch) that hurt....


     Last night I played a game against Jeremy and his Tau army with Eldar support.  We played a Purge the Alien game with Dawn of War setup.  Needless to say, I did not purge enough aliens....

My List:
HQ:
Sammael: Jetbike
Librarian: Bike, Auspex
Command: Apothecary, Standard of Devastation, Grenade
Troop:
RWASx6: 2 Melta, Typhoon
RWASx6: 2 Plasma, Typhoon
RWASx6: 2 Plasma, Landspeeder w/ MM
Fast:
White Knightsx5

His List: (due to the campaign, he got an extra 150 points to spend on this army, not that it made too much difference....)

HQ:
Commander Shas'o: Missle, Plasma, Shield, Multi-tracker
Bodyguard: Frag, Plasma, Shield
Bodyguard: Missle, Plasma, Shield
Farseer: Warding, Witnessing, Spirit Stones


Troop:
Firewarriorx12: 3x Carbine, Bonding Knife
Dire Avengers: Bladestorm, Defend, Diresword

Elite:
Crisis Suit: Fustion, Missle
Stealth Suits: 2x,Burst Cannon, Fusion
Wraithguardx6: Warlock, Wave Serpent w/ TL Starcannon


Heavy:
Hammerhead: 2x Burst Cannon, Disruption Pod, Blacksun Filter
Hammerhead: Smart Missle, Disruption Pod, Blacksun Filter
Broadside: Smart Missle, Shield Drone
Wraithlord: Catapult, Wraithblade

Defense Line w/ Quad Gun

     So the combination of me being an idiot, plus him playing a good game resulted in me getting wiped off the table after 6 turns.  I was obviously too concerned with my Command Squad dying to S10 Railgun shots that I mis-used almost my entire army.  It started with the deployment:


    I deployed and used my scout move to get the Command Squad to hide behind the forward stack of containers.  You can see the giant blob of bikes on the near side of them.  I also forgot to deploy my two HQ unit where they were supposed to go, and I made myself live with it, not asking for any favors so I could put them in the right spot.  Well, I finally learned that Hammerheads have a secondary shot that is a large blast.  I learned this while getting hit 10 times from each shot.  The front row had to re-roll their successful armor saves due to Misfortune from the Farseer, too.  I surely would have never made this mistake with my old 'nilla White Scars list.  The Standard of Devastation is good, but you have to have your bikes ALIVE to use it.  After his first round of shooting, I believe I had a pile of about 13 dead bikes.  He made a great move with his Wave serpent to block the only open path to his front line, too. 

     After that beating, I was already hurting, and for the remainder of the game I feel I rolled at or below average.  I know that 3 turns of shooting all 4 Landspeeders at his Hammerheads (and a couple shots at the Wraithlord) resulted in just one glancing hit.  As I moved everyone forward, there was not a lot I could do.  I know I killed a few Dire Avengers, causing them to flee off the board.  The Broadside fell back, too, but was still on the board.  I did manage to kill his Wraithlord, who was coming right at me.  The melta squad and Knights moved up the right flank to get closer, hugging those containers for cover and line of sight blocking. 
     On the second turn, all of his remaining suits came in from reserve and deepstruck behind my lines.  I would have to choose between continuing toward his line and back-tracking to counter them.  Also the Wraithguard got out of their transport and shot me up.  I learned to spread out more, but I lost my Librarian and some more bikes.  The Apothecary and Champion died as well. 
     On my turn, there was little to do.  My Multi-melta Speeder did not arrive due to his warlord trait.  I ignored the Stealth team and used one plasma squad to go after his Shas'o and bodyguard.   I hit his Wraithguard with a Rad Grenade, but still needed 5's to wound them.  Even with the Standard, 20 shots was not near enough to wear them down.  They got charged and I believe we tied combat.  Sam'E Khan charged the lone suit, and wounded himself moving in, but killed the sucker.  I put a wound on his HQ but we still were stuck in combat. 
     Turn 3 saw me lose Sam'E and somemore bikes from everywhere.  More of the same...  Oh, and I failed all 3 of my Hit 'n Run rolls, so no shooting then charging...
     I finally got the flanking melta squad into combat with Firewarriors and a farseer in his lines.  I won combat but they held tight.  I hit his Broadside with 7 AP2 wounds from the Knights and killed it.  Lost the final bike fighting his HQ.   Not too much to report here either. 

     The rest of the match was him mopping up what was left.  I finally got my speeder from reserve on turn 4 and shot a Hammerhead in the rear.  Still didn' kill it with AP1!!!!  I had terrible generalship and bad luck, but I don't want to take away from how well he played against me.  He made some great moves to take me out.  I can't wait to play him again so I can take what I learned and put it to practice.  Now, I'm looking for that Ice Pack.....


Monday, March 18, 2013

100 point Imperial List

     Last night, I tried out my new 100 point Imperial list for X-wing miniatures game.  I had found some material about deploying them in a 2-wide, 3-deep formation to keep them within range 1 of each other.  This lets me take advantage of the Swarm Tactics and Howlrunners abilities.  Here is the list

Tie Advanced: Darth Vader - Swarm Tactics
Tie Fighter: Howlrunner - Swarm Tactics
Tie Fighter: Obsidian Squadron
Tie Fighter: Academy Pilot

     The trick with the deployment is that you cannot fit this formation in the deploymen zone, as it is too deep.  There is a good way to deploy the rear row ships on either side at a 45 degree angle.  On the first move, you can get them behind the rest.

     In my first game with them, I was up against Cupid who was playing a very elite 3-ship Rebel build using Wedge with Garven and Dutch tag-teaming off each other.  They had some droid upgrades, too.  He ended up flying right into my saturation zone of fire with Wedge on turn 2.  I used Swarm Tactics and Howlrunners re-roll to take out Wedge before his other pilots even got to fire.  I had some good rolls with my Evades and everybody survived.  Turn 3 saw every ship from both sides perform a Kiogoran flip and we were all facing each other again.  This time, I took down Dutch in his Y-wing.  After the next movement, the scene looked bad for the Rebel Scum with all 6 of my ships having him in their sights....


     Needless to say, the game was over after that turn.  Now, given that I rolled well and he rolled bad, I still feel that this list is dangerous.  This was only my second game using the Empire, and the previous time was not nearly as much of a swarm.  I will indeed be using this in the future, but first I need to get me another Tie fighter, as I was borrowing one from Cupid. 

     Also, I really like my GF9 game mat, even though it is overpriced.  In addition to looking great and having clearly defined borders, the texture of the surface prevents a lot of the accidental movement that happens with slick surfaces.  What do you think?


Friday, March 15, 2013

What Chaos Space Marines?......


      This Thursday night, I faced a Chaos Space Marine Army. We played the Crusade Mission with 5 objectives, and Hammer and Anvil deployment.

WHITE SCARS:
The Fritos are a proxy for a Landraider.....
Sammael
Librarian: Lvl 2 Mastery, SM Bike, Power Field Generator
Command Squad: Apothecary, Champion, Standard of Devastation, RW Grenade Launcher

RWAS x6: Melta x2, Attack Bike w/ Multi-melta, Melta Bombs
RWAS x6: Plasma x2, Landspeeder Typhoon, Melta Bombs
RWAS x6: Plasma x2, Combi-plasma

White Knights x6: Melta Bombs


Chaos Space Marines:
Kharn the Betrayer
Chaos Lord: Jump Pack
Cultists x10: Heavy Stubber
Night Lords x10: Plasma Gun, LasCannon
Night Lords x10: Plasma Gun, LasCannon
Khorne Berzerkers x10:
Havocs x5: 3x Heavy Bolters, Missle Launcher
Raptors x10: Melta Gun x2
Raptors x5: Melta Gun x2
Hellbrute: Plasma Cannon
Predator: T.L. LasCannon, Heavy Bolters


     I won the roll-off to go first.  I set up as I always do; Command Squad in the center with each Bike Squad within 6" of the Standard of Devastation.  My White Knights, Speeders, and Attack Bikes took the right flank, or more acurately, the right side.  Short table edges don't really work too well for any kind of flanking maneuvers.  He infiltrated one unit of Night Lords into the trees behind the shrine due to his warlord trait.  I used my scout move to put every  Bike Squad within 24" of the infiltrated unit.  Then he managed to Seize the Initiative. 

Top of 1:

Start of the game.
     Night fighting was in effect so his shooting was almost useless.  My jink saves, combined with the stealth and shrouded bonuses, were giving me all the saves I needed.  I made all my 3+ saves on the regular bikes, but failed one from a Plasma Cannon on a 2+!!!  One bike down, 39 to go....


Bottom of turn 1.
Bottom of 2:
     Well, that certainly could have gone worse.  I was making saves like a boss.  My movement in turn one saw me moving the Bike blob up to get some more of his units within 24".  I wanted to be sure to finish off the unit that infiltrated, and then have some shots left over to work on those Cultists.  I was concerned with the threat range of both of his Raptor squads, so I made sure to stay well back from them.  I also used my Attack bikes to screen the unit of White Knights, who deployed in cover to force a difficult terrain roll if they did try to charge.  Shooting saw the infiltrators, and the front row of Cultists wiped out.  I got 4 more from the second unit of Cultists and 3 Berzerkers, too.  My Librarian rolled box cars and lost a wound.  The Hellbrute on my right made all his saves from the Landspeeders. 

End of turn 1.
Top of 2:
Top of turn 2.
     In his movement phase, he pushed his Cultists, Raptors, Berzerkers, and Night Lords all forward at full speed.  Shooting was again ineffective, managing 2 more dead bikes and a wounded attack bike.  A generous 12" move from the raptors saw them able to assault the Attack bike.  They did 3 wounds, but I saved them all and performed a Hit & Run toward his Predator while the Raptors consolidated 1" into the woods.  3 down, 37 to go.

Middle of turn 2.


End of 2.
Bottom of 2:
    My movement consisted of moving the Attack Bikes and Landspeeders full speed toward the Predator and Hellbrute.  The White Knights moved up into rapid fire range of the Berzerkers.  Everyone else simply moved about a half inch forward to get their Jink saves.  The Attack Bikes and Landspeeders only managed to immobilize the Hellbrute.  The White Knights unloaded on the Berzerkers, killing them all, but Kharn made his invuln save.  The Librarian 'Mind Shackled' a Night Lord and made him take out a Cultist.  More shooting took out the last of the Cultists and half of the nearest Night Lords.  I almost forgot to fire on the Raptors, and had to finish them with bikes from my left side.  My small squad finished them off.  I forgot to charge with the White Knights, but it was probably for the best.

Top of 3:
     He moved up his large Raptor squad and Kharn made his way toward my lines.  More shooting was directed at my Command Squad, but I was making saves I shouldn't have been.  The only damage came from the assault of the Raptors and Kharn on my White Knights.  Kharn wiped them out at I5 before anyone else could even blink....  7 down, 33 to go.

Bottom of 3:
     My movement was again just enough to get a Jink save.  I poured everything into the Raptors and Kharn, killing them all.  My Attack Bikes finally quit shooting trees and hit the damn Hellbrute, getting another imobilized result, which took an additional hull point and killed it.  Then I managed to blow a Heavy Bolter off the Predator. 

Top of 4:
     He started moving his remaining Hellbrute towards me with the remainder of a Night Lords squad.  This turn I lost quite a few bikes to his shooting and he got started to break down the Command squad.  I think I lost about 8 or 9 bikes in this round, including the Champion, Apothecary and Librarian. 
Middle of 4.


Bottom of 4:
     That certainly didn't feel good, I need to finish him off ASAP.  I moved up the melta squad in front of the Hellbrute and everyone else came forward to get into range of the nearest Night Lords.  I took out some Night Lords with the Landspeeders and blew up the Predator with the Attack Biks.  Melta blew up the Hellbrute and bolters finished the night lords in my face.  Plasma took down some more Night Lords.  So close....


Top of 5.
Top of 5:
       He finally finished off the Standard Bearer, but too late.  Still going strong...


Bottom of 5:
     Moping up everything I can, and he concedes with just a few models left. 


     I'm glad he had no Helldrakes.  I need to mod this list to be able to handle those guys.  We'll have to see. 


Nurgle Daemons

     I wanted to post the pics of Dan's Nurgle HQ and Daemon Princes.  I forgot to get pictures of them when we played and I very much enjoyed playing against his army and him.  He does a great job of modeling and painting.  He is admittedly more into the painting and modeling than gaming, as am I.  I really like the little Nurgling in the hand of the Daemon Prince.  I probably should have gotten a better pic of the Prince with the Plague Drone rotors for wings, but you get the idea.  Anyway, here ya go!!!!!!!!!!!!


Wednesday, March 13, 2013

3000 point Planetstrike


Saturday was a 3000 point planetstrike game vs. Alec and his Chaos Daemons w/ Choas Marines allies.  My list was approximately as follows:

Space Marines
Captain - relic blade, storm bolter
Tac Squad x10 - power fist, flamer, lascannon
Tac Squad x10 - power sword, melta gun, heavy bolter
Assault Squad x10 - power fist, 2x plasma pistol, flamer
3x Landspeeder - typhoon missles
2x Landspeeder - multi-melta
Devastator Squad x5 - 4x missle launcher
2x Vindicator - siege shield
2x Predator - lascannon sponsons
2x Storm Talon - assault cannon, heavy bolter

Blood Angels
Chaplain - power fist
Death Company x8 - Power Fist
Storm Raven - heavy bolter, assault cannon

I honestly don't know what he had, but here is a guess.

Chaos Daemons
Khorne HQ
Khorne Daemon Prince
Tzeentch Daemon Prince
20 Bloodletters
20 Bloodletters
20 Pink Horrors
10 Flesh Hounds
3 Blood Crushers
3 Screamers of Tzeentch
Soul Grinder of Nurgle
Chaos Space Marines
5x Marines, Melta guns
Helldrake
8x Terminators w/ Landraider

     I chose to go with 3 bastions, using the dropzone denial strategem.  I feel it is usually the way to go.  This lets me set up right on the board edge and stay as far from the other 3 edges as I can.  He then chose the short edge to the right of my board edge.  I like to have a ring of difficult terrain around my buildings, just to slow down anything that is looking to charge in.  Here is how I set them up:


     I put the Devastator squad on top of the small bastion in the middle.  The 3 Tac squads were spread out between the other 2 bastions (top and inside), the rhino, and inside the middle bastion.  My tanks were divided onto either side. 

    He started the game with the Firestorm attacks, of which he got 7.  I don't think a single one of these didn't wreck some face.  When Planetstrike came out, blast weapons only got half strength if the center hole wasn't over the target.  Now, in 6th edition, they can scatter and hit multiple targets at their full strength.  Which happened.  A LOT!  Here is my setup after the Firestorm:


     One of the bastions colapsed completely, killing 4 guys inside and 2 on top.  I lost a Rhino and a Vindicator, too.  All my other tanks lost at least 1 Hull Point.  Then he rolled for his reserves and got most of what he wanted.  He also had instruments in most of his daemon units, so he could bring another unit on from reserve if the unit with the instrument comes in.  Here is how he deployed:


     One unit, which I think was a big group of Raptors with a lord attached, scattered onto my guys and were destroyed.  His shooting was pretty devastating, taking out all of my tanks.  He then assaulted the Tac squad with a big Daemon guy, killing the sergeant in a challenge.  Overall, he did quite a bit of damage, but I still had my heavy hitters coming in....

     My reserves showed up.  I got everything except for my assault squad, which had a mishap and had to go back into reserves.  The melta speeders hit their mark next to the Landraider and blew it up.  The first storm talon scattered, but remained behind the Helldrake for rear armour shots.  The second one scattered almost onto the other, but I could rotate it to prevent it from touching.  This, however, meant the Helldrake was no longer in his arc of fire.  The storm raven came on from the short edge to the left of my bastions, not wanting to risk a deep strike mishap.  The first Stormtalon got some great rolls and took down the Helldrake.  My Sternguard dropped in on the Pink Horrors and Bloodletters.  Taking a decent chunk out of both.  Overall, I didn't make a big enough dent in them to prevent what was coming, but it still felt good to kill some Chaos scum....

     At this point, he started killing everything, and I esentially stopped taking pictures as I was too busy putting away my dead models.  I his flying Daemon Prince used vector strike to bring down my Stormraven, killing all but 2 Death Co and imobilizing the Dread.  Another Daemon prince took down a Storm Talon with vector strike, too.  His Bloodletters all had Melta bombs due to the strategem that he chose, as so were ruining my bastions. 

     I have to say that Chaos Daemons as Planetstrike Attackers is a really rough army to beat.  I think Alec will be using this to his advantage in our campaign on Thursday nights.  I feel that the best strategy is to reserve as much as you can to prevent the firestorm damage.  Then maybe I will deploy in the center and use the force field strategem that protects from firestorm damage.  I definitely need to get in some more games to see how I like Planetstrike in 6th edition.


Friday, March 8, 2013

!!White Scars kill 99.99% of Germs!!

     Last night was the start of our campaign league at Fantasy Games.  My first game was against Dan, playing an all-Nurgle Daemon army.  I'm currently unfamiliar with the new codex, so I don't know exactly what his list was.  Here's my best guess:

Nurgle, please...
Big Fat Decaying HQ Guy: gross stuff, some psychic thing
Flying Daemon Prince type guy:
9x Nurglings w/ Herald
9x Nurglings w/ Kumar
10x Plaguebearers
10x Plaguebearers
10x Plaguebearers


Plaguebearers

   I need to get some pics of his HQ and Daemon Prince guys.  His army was painted up awesome-ly.  I really liked all his little conversions and I want to get a pic of the flying prince that has the rotor things from the Plague Drone instead of wings.  My list was the same as usual.  I'm keeping with it until I figure out what needs to change.  I can tell already, I'm gonna need something to help with those single- and dual-Helldrake lists.

HQ:
Sammael: Corvex (jetbike)
Librarian: SM Bike, Level 2 Psycher, Power Field Generator
RW Command Squad: Apothecary, Champion, Standard of Devastation,

Troops: RWAS=Ravenwing Attack Squadron x6
RWAS: Melta Gun x2, Attack Bike w/ MM
RWAS: Plasma Gun x2, Landspeeder Typhoon w/ HB
RWAS: Combi-Plasma, Plasma Gun x2, Attack Bike w/ MM

Fast:
Black Knights: Power Weapon

"WHITE Knights"
     We played the "Big Guns Never Tire" mission (5 objectives) with Dawn of War deployment.  I'm a fan of this deployment as it allows me the most space and a flexible setup.  He won the roll-off and set up first.  Keeping as much in reserves as he could, he deployed all 3 Daemon Princes and the HQ guy, putting them in or behind cover so they could take advantage of their "Shrouded" rule.  The HQ and one guy were in the center (seen on the far left, below).  He deployed a unit of Plaguebearers on the right in some trees with the other 2 princes next to them (near where you see the tape measure, below).  My deployment was predictable.  With no template or blast weapons to worry about, I put the command squad in the middle of my bike blob, centered between his 2 groups of guys.  Every RWAS was within 6" of the Standard of Devastation for maximum Salvo goodness.  My Landspeeders took up the rear and the Black Knights (I'm gonna call them White Knights from now on, just look at em!) deployed on the right flank.  I used my scout move to get the main blob forward a couple of inches and the WHITE Knights moved down his flank.  I lost one biker to a failed dangerous terrain test before the game even started!

    
Top of 1:
    The game started off bad for him, and just got worse from there.  I seized the initiative, which is just too good.  I rolled Invisibility for a psychic power and cast it on my command squad.  GO 2+ COVER SAVE!!!!  My first goal was to get his nearest prince to take a grounded test.  The first squad managed to score 3 snap shots, but he passed the grounding.  The next squad managed 7 snap shots; grounding him and doing a couple of wounds.  Then the White Knights plasma'd him up for a couple more wounds.  Another squad took him out with bolter fire.  So I tried the same thing on the other prince on the right.  Esentially got the same thing to happen and had him missing 2 big guys at the end of the turn.  I tried to do the same to the last prince, but I had run out of guns.  I have no assault moves.


Middle of turn 1.
Bottom of 1:

     He didn't have a lot to do.  The Plaguebearers moved toward the White Knights while the last prince flew at me full speed, intent on revenge.  The HQ moved onto the hill for some of that area terrain cover.  My first experience with the warpstorm table was a result of 11.  This caused my Librarian to take a leadership test on 3d6, which he failed.  This turned him into a Herald of Nurgle, crap!  The plague bearers attempted to charge the White Knights, but I rolled 5 snap shots and killed 4 guys.  They were then out of the charge range.  The Prince declared a charge at the combi-plasma squad in front.  I lost both of my plasma gunners to "gets hot" rolls.  He was still in charge range by about a millimeter.  He hit me 3 times but rolled all ones so no damage was done.  They used Hit & Run to get out while the prince consolidated into the trees. 
End of Turn 1: 

Top of 2:
     I use my moves to get everone within 24" of both the Plaguebearers and the Prince.  Shooting makes short work of the Prince who made enough saves to require more of my attention than I wanted to give him.  My old Librarian, now in Nurgle form, didn't last long.  The Plaguebearers took some plasma and bolt shells to the face, and then got assaulted by the guys who know how, finishing them off.  I tried to finish off the HQ and end the game, but all of my Multi-meltas rolled 1's to-hit and the T7 was too much for the few remaining bolter shots.  I think I only managed one wound. 

Middle of turn 2.
Bottom of 2:
     He got all of his reserves except for the one unit of Nurglings he wanted.  See below for how he chose to have them deepstrike.  The HQ casted Enfeeble on one of my attack bikes and failed his psychic test for another power. There was very little he could do. No units had shooting attacks and Nurgle daemons are slow and purposeful so they can't run. His turn was done.
End of turn 2.

Top of 3:
     My turn consisted of moving the command squad up into the woods near the Nurglings.  They got within 12" to make use of the Ravenwing Grenade Launcher.  Again, the rest of the full bike squads got within 6" of the Standard.  The White Knights backed up to be 9" from the nearest Plaguebearers for the double tap.  The small squad moved in front of them for a screen.  I used the Rad Grenade coming from the command squad and got a hit, reducing the Nurglings to T2.  Sammael hit dead on with his plasma cannon, too.  With the Nurglings at T2, they were being insta-killed by bolter fire.  Notice the complete lack of Nurglings at the end of the turn....  I also took down the HQ and did some damage to two of the plaguebearers squads.  I managed to get one attack bike into range to charge some Nurglings, trying to tie up the unit.  I killed off one, but they have those poisoned attacks, so the attack bike was killed and the Plaguebearers consolidated closer to me instead.
Middle of turn 3.
Bottom of 3:
     His last unit came in from reserve.  He rolled a 9 on the Warpstorm table which causes a S8 blast hit on an enemy unit on the roll of a 6.  He got four 6's out of 12 units, NICE!  The first shot scattered into his Plaguebearers, killing one.  I lost 2 or 3 bikes from it all.  Thank god for my 5+ Jink save.  His small unit of Plaguebearers charged my screening unit, but got wiped out by the bikers.  Another unit charged the Bikes in front of my command squad.  I think we actually tied that combat, and my guys failed their Hit & Run roll.

Bottom of turn 3.
Top of 4:
     I moved everyone toward his remaining units.  The Nurglings got hit with the Rad Grenade again and they were shot to death by the White Knights.  The full squad of Plaguebearers was shot up and charged, getting wiped out.  We finished off the combat from the previous turn, and he was left with one Plaguebearer.  He conceded to me at this point.

Middle of turn 4 and End of the game.
 
     I have to say that that Standard of Devastation is just incredible when used correctly.  At the start of the game I was fearing all those big guys, but the tons of re-rollable shots helped me ground them and then helped pile on the wounds.  I will say for sure that he had some horrible luck, starting with me Seizing and his triple 1's on his Daemon Prince's charge.  I, on the other hand, was rolling great.  I had 2 times that I fired with a full squad of bikers and didn't miss a shot out of 24.  Honestly, I lost more models to my own Gets Hot, failed Dangerous Terrain tests, and random Warpstorm results then I did from his attacks.  I still need to figure out how to deal with certain builds with this list, but I have some ideas involving twin-linked shots up the Wazoo.  I just hope he had some fun, too!!!